WPBakery Page Builder User Guide
This post is designed to be used as a guide for WPBakery Page Builder. Providing a clear understanding of the most commonly used functions of the plugin. Allowing you to have greater freedom in performing updates to your own website, without the help of a developer.
In this post we’ll go in to great depth and explain using live screen shots how to add or update text on your website and replace images. Embedding video content and Google Maps within your websites pages as well as a whole other range of tasks. By the end of this post you’ll be a pro and confident is updating your website with ease.
But first, here’s a quick overview of what WPBakery Page Builder actually is and how it can be utilised for web design.
What is WPBakery Page Builder?
In short it’s a plugin, which is essentially a piece of software that is added to your WordPress website. Allowing you to perform additional functions out with the basic constraints of the platform. In this case WPBakery Page Builder performs the function of adding the content to the pages of your website. Everything from text, images, spacing or videos is controlled via the WPBakery page builder plugin. Which will have been installed to your admin area by your website developer at the time of creation.
If you’ve had your website for a few years, you may already be familiar with Visual Composer, a similar plugin created by the same developers. WPBakery is essentially the newer version of this original plugin which has been renamed and re-branded.
You can learn more about the differences between Visual Composer and WPBakery Page Builder in this recent post and which guide is the most relevant one for you to follow. Alternatively, if you’re a Primal Space client, then reach out to us and we’ll be able to alert you to the correct guide that’s compatible with your admin area.
How to Use WPBakery Page Builder
Now you’ll understand what WPBakery page Builder is, let’s dive in and take a look at the various functions. You should already be familiar with the admin area for your website. The area we’ll be focusing on in this post specifically is the individual pages. As WPBakery is the page builder that drives your content creation.
Before we discuss individual functions you’ll want to select the page you wish to edit. You can do so by clicking on pages in the left menu area and then hovering over the page you wish to edit. Then clicking on edit to open the back end of that specific page.
Adding/Updating Text
Now that you’ve opened the page you wish to edit, one of the most commonly used functions that you’ll use is editing a text block. Use the next few screenshots to discover how you can add or update text on your web page. You can either click on the pen icon which will appear on a green box when you hover over an existing text block. Or add a new element to create a new text block.
You’ll then want to select the text block element from the elements library. It looks like this;
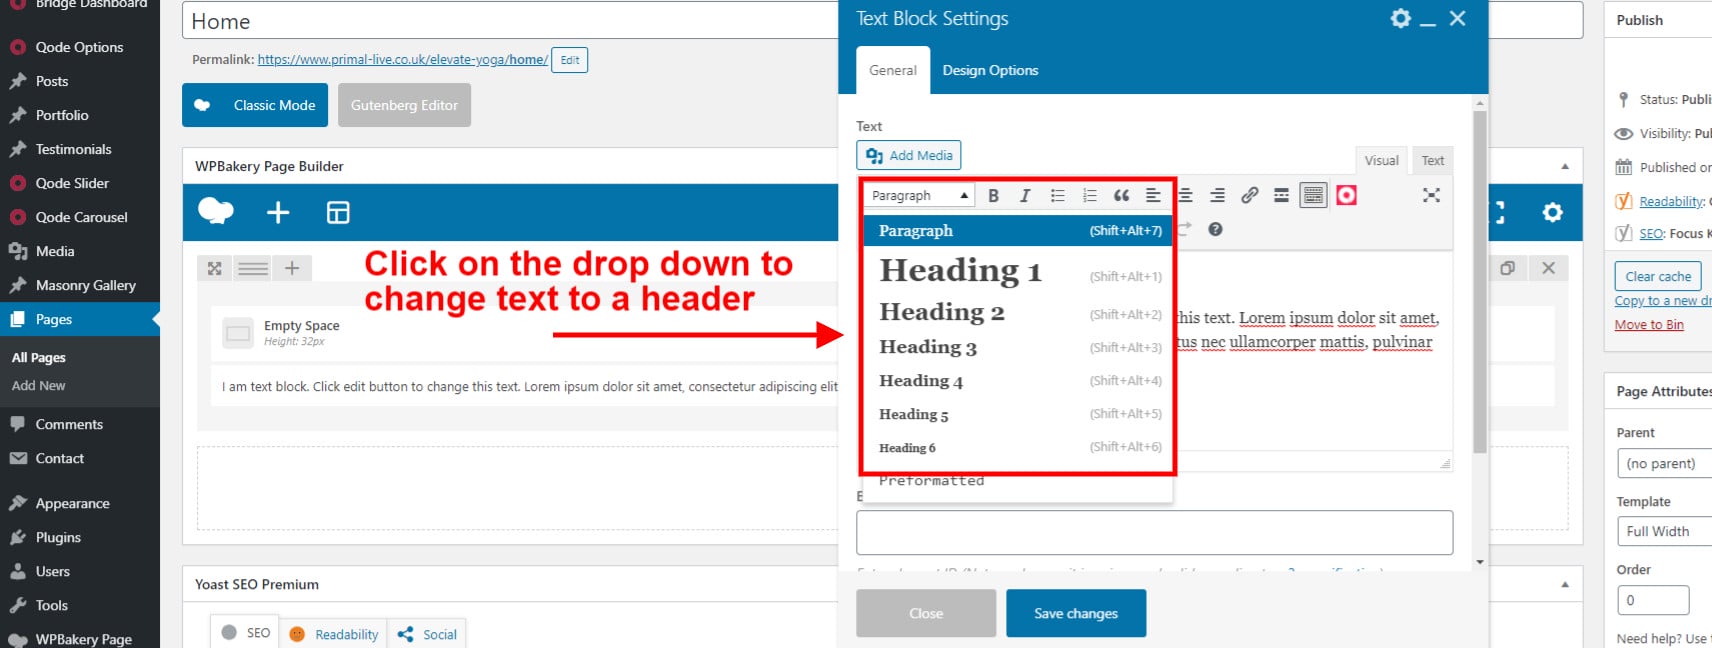
Once you’ve done so it will open the new text block. Or if you have clicked on the green pen icon to edit your existing text block, it will also open something that looks like the below screenshot. Here you’ll be able to add or update your text. You can also use all of the editing tools to change or format your text. Or create headers using the drop down.
Once you’ve completed your changes don’ forget to hit ‘save’ to update the element.
Previewing Updates in the Front-End
Don’t forget to save every change you make throughout the design and editing process. This can be done by selecting the blue ‘Update’ button to the right of the page you are working on. You can also preview any changes you have made by clicking on the ‘Preview’ button. this will open the front end of the site and show you your changes as a live preview, before you make these permanent by clicking ‘update.’ This can be a great way to see your site as a user would, before you commit to the changes by clicking ‘update’.
Uploading/Updating an Image
Another common feature that you’ll regularly use within WPBakery page builder is the image upload element. Again you can use the green pen icon that will appear on hover to update an existing image that is already on the page. Or click on the plus, as featured above, to add a new image to the page from the elements library.
The element to select looks like this;
Once you’ve clicked on this to add it to your page it will open up to allow you to select the image. By clicking on the plus sign in the image box
You’ll then be directed to the media library for your site. Here you’ll be able to select from an existing image that has already been uploaded. Or you can drag and drop a new image into your media library from a folder on your desktop.
It’s important to mention here that images should be uploaded to the correct size for the specific area on the page they’ll be used. Uploading excessively large images will result in slow load times for your site and therefore negatively impact your users experience. If you aren’t sure about how to do this, we have a blog post guide which goes into great detail on how to resize images for your website.
It’s also extremely important to mention that any images that are added to your websites pages should be high resolution, bright and demonstrate a level of professionalism. They are after all representing your brand. If you’re concerned that the images you have aren’t doing your business justice, we would recommend using free stock images, until you do have better quality images.
Once you’ve uploaded an image, be sure to name the image to something that is relevant to the topic of the page. You can do this by clicking on the image and typing in the image name and alt text fields below the image preview to the right. This will improve SEO, as search engines like all of the content of the page to be relevant to the topic that you’re targeting.
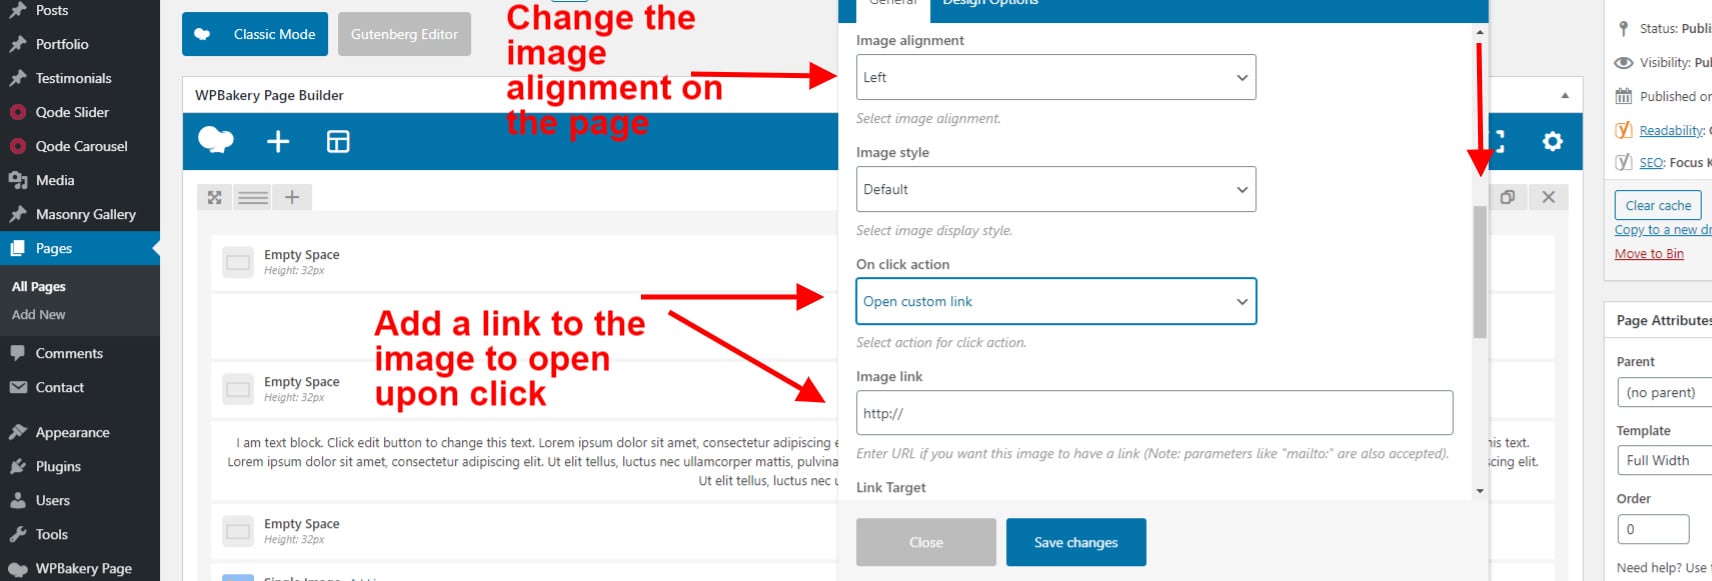
Once you’re happy with the image you can click on the ‘set image’ button to select the new image. Next you’ll be able to select from further image editing tools to decide how the image is presented on the page. You can do this by scrolling further down to an area of the element that looks like this;
Alternatively, you may wish to update an existing image. To do so you click on the red cross on the current image and then follow the steps outlined above.
As before, once you’ve completed these steps be sure to save your changes to the element by clicking the blue ‘Save changes’ button.
Adding a Spacer Gap
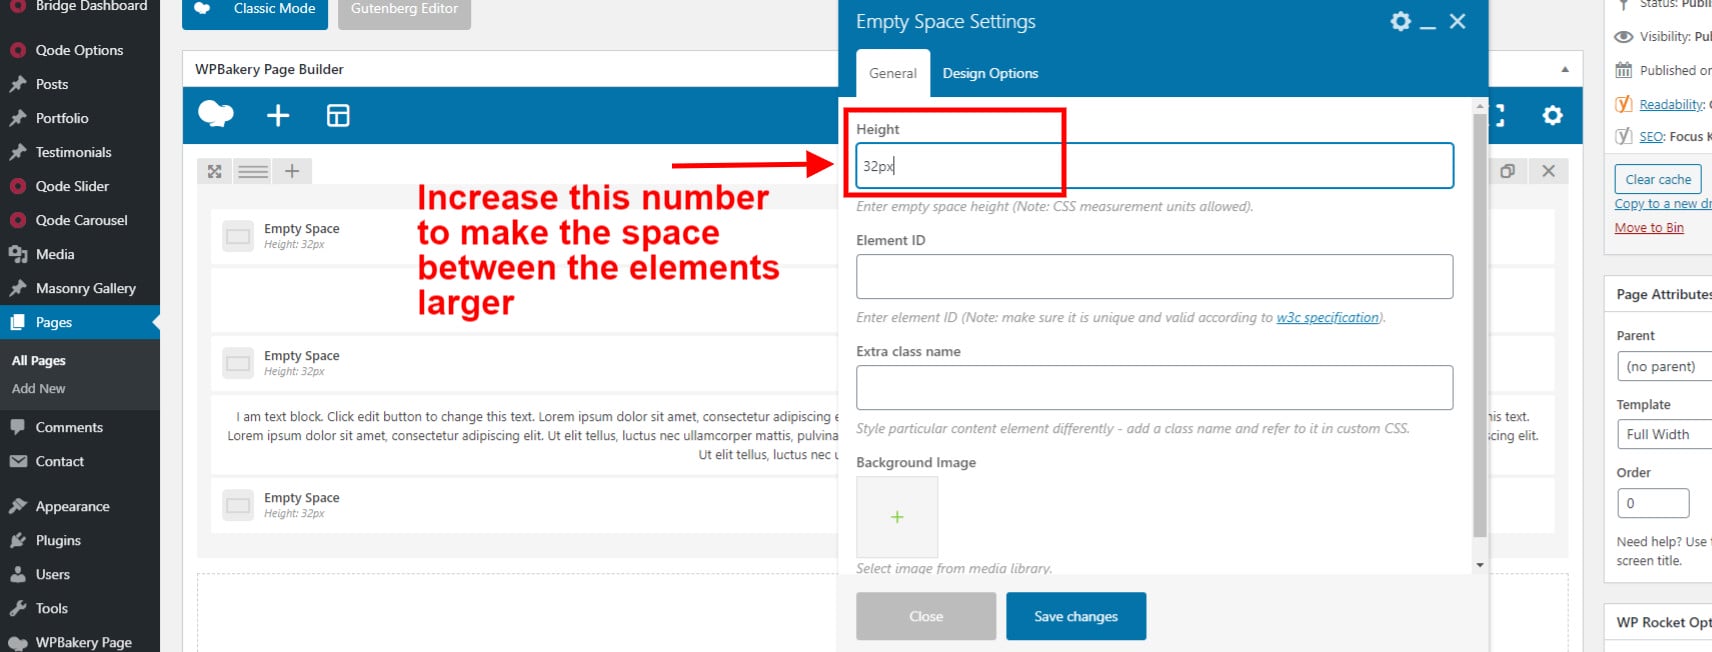
Another WPBakery page builder tool you will regularly use is the spacer gap function which allows you to format the content on your page. Creating space between various different elements. You would either click on the pen upon hover to edit the existing ’empty space’ and increase or decrease the number. Or add a new spacer gap. It looks like this in the elements library;
You’ll then be able to update the size of the space that you are adding to be larger or smaller. The default size of a spacer gap is 32px. To change this just click on the number and increase or decrease the number then click ‘save changes.’ Don’t forget to leave the ‘px’ at the end of the number or the changes won’t work effectively.
Duplicate a Row
The row toggle function of WPBakery page builder is a great feature that allows you to duplicate an entire area. Particularly when you’re new to updating your website and using these features. It can be a great way to give you piece of mind that all is not lost if you make a mistake. We recommend using the toggle a row feature often. Duplicate the row you wish to work on and edit it to your hearts content. You can then delete the old row when you’re happy with the new one.
To duplicate the row simple click on the ‘clone’ button to the right of the row beside the cross. You can also duplicate all other individual elements using the WPBakery page builder.
This feature is particularly useful for repeating spacer gaps or text blocks or images, that you may have spend some time formatting. You can also duplicate elements that we have created when designing your website such as buttons, as these are somewhat more complex to explain how to create from scratch if you’re new to updating your site.
Google Maps Integration
You can also add a Google Map to your website using WPBakery page builder. Simply select the google map icon from the elements library.
You can then add your Google Maps API key to allow the map to show. BY scrolling down there are a range of formatting options to change how the map is displayed on the page. Don’t forget to preview that the map is loading correctly before updating your changes on the live page.
Embedding Video Content
When adding video content to your site, we recommend that you serve this to your site from an external platform such as YouTube or Vimeo. This will ensure that your site isn’t being bogged down by large media files and runs faster and more efficiently. Embedding video content to your site is easy with WPBakery. Simpy select the video element from the elements library.
Then copy and paste the link address for the video that you wish to embed within your web page. You can select from the display options within the element tool bar to select a cover image, or edit the format before saving your work.
Integrating a Contact Form
At the time of building your site, your developer will have installed Contact From 7 which is another commonly used plugin. This will be fully set up with your contact details and ready to use within your site. As your business develops it can be common to want to add additional contact forms to your websites pages. it’s easy to do this by selecting contact form 7 from the elements library.
You’ll then be able to select the contact form you wish to use from the drop down menu.
If for any reason your contact form isn’t loading properly then do get in touch with us. As this is may involve some CSS from our end to pull the contact form on to the page.
Duplicating Entire Rows to Use on Other Pages
On some occasions you may wish to copy an entire row from one page of your website to another. Perhaps there’s an image gallery that you love or another piece of content. We’ve already learned about how to toggle a row, however this only works for content within the same page. If you wish to carry content across pages then you need to create a template. This can easily be done using WPBakery Page Builder.
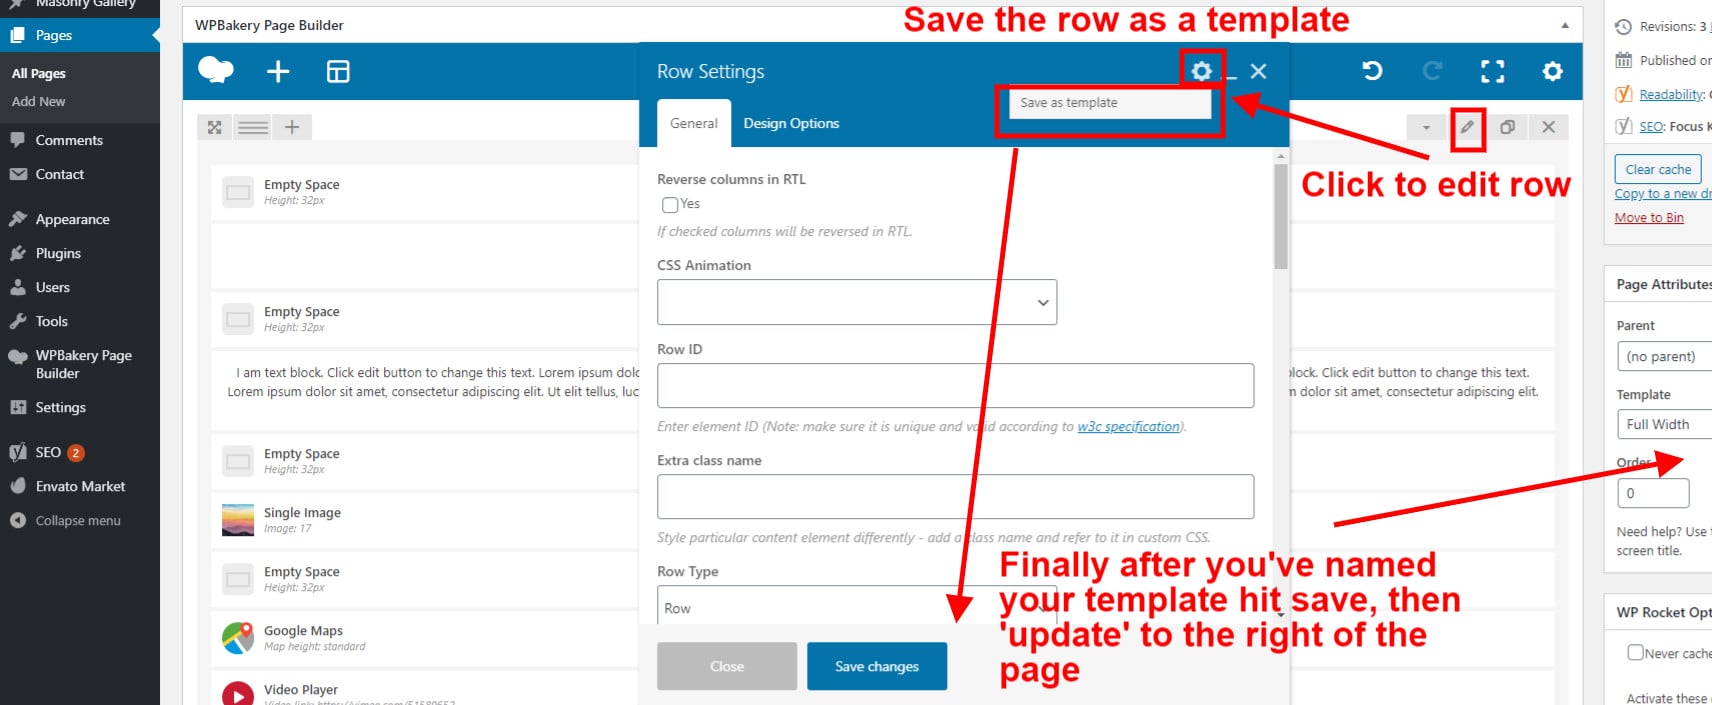
Simply click on the pen icon to the top right of the row you wish to duplicate. The on the wheel in the right corner of the pop up and then on ‘save as template.’ Once you’ve done this you’ll be able to name your template. Next you’ll need to click save on the element and then finally ‘update’ to the right hand side of the page.
Next you’ll need to navigate to the page that you wish to add the template to. Selecting the third icon with the three rectangles which is where all of your websites templates live. You’ll then be able to select the template that you wish to apply to the page from the pop out menu.
The template will automatically be added to the bottom of the page. However you can drag an drop this row to sit anywhere on the page. You’ll just need to hit ‘update’ to see your changes take effect.
Duplicating Elements to Use on Other Pages
A similar process is followed to update an element. For instance a button or an image that appears on one page that you want to use on other pages of your site. Let’s take a look at how to do this.
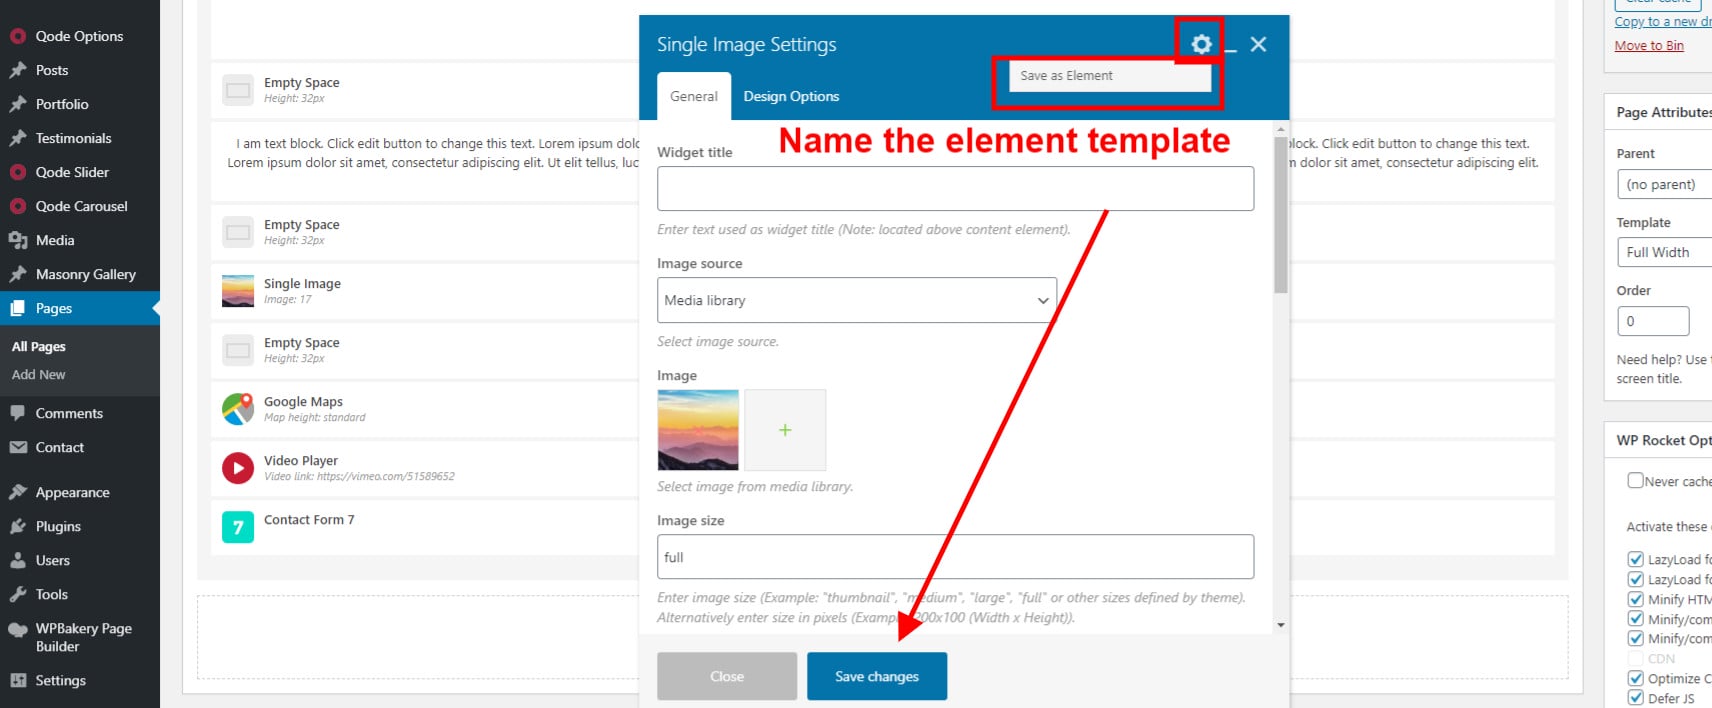
Firstly you’ll want to hover on the element that you wish to create a template for and click on the green pen to edit. Then, as we done with creating a template for a row, click on the wheel icon to the top right corner of the pop out then click ‘save as element.’ Next we’ll need to name the element and hit save, finally clicking the ‘update’ button to the right of the page to save the template.
Next you’ll need to navigate again to the page that you want to add the template to. This time clicking on the plus sign on the row where you’d like to add the new element template. Here the library will open and you’ll be able to search for the element that you’ve just saved in the search bar to the top right corner of the pop out. Once you’ve located your template you can add this to the page as you would with any other element. Don’t forget to hit save.
A Guide to WPBakery Page Builder
You’ll now have a clear understanding of all the simple, everyday functions of WPBakery Page Builder that will allow you to confidently update your sites content with ease. This is a guide that you can come back to time and time again as you become more proficient in navigating the admin area of your site and updating your websites pages.
It can be daunting learning something new. However everything is challenging, before it comes easy. All experts were once beginners – including us. We’re confident that with a bit of practice and the right support you’ll be a pro at using WPBakery Page Builder to your advantage.
We hope this post has shed some light on the tasks that you’ll use most regularly when updating your WordPress website. However if there is a particular element that you’d like us to talk about in this post that we haven’t guided you through then please do let us know. Our blog area is filled with other useful guides on how to update your WordPress website. Including more specific guides for Gutenberg, Elementor and Visual Composer.
Likewise if you are struggling to use these functions and need one to one help in updating your site then don’t hesitate to get in touch with us here at Primal Space. We offer WordPress website development and support.
Did you find this post helpful? Feel free to share it with a friend or send us your feedback.


