How To Resize Images For Web Use
When resizing images for web use on your site, it’s incredibly important that they are reduced to the smallest possible file size. While not compromising on the overall resolution. Your total web page size should be as low a number as possible ensuring that the page loads as fast as possible. At the same time not eating up all of the disk space where your website is hosted. The majority of your websites size is taken up by images and video content. In this post we’ll teach you how to resize your images. Therefore reducing their file size and at the same time ensuring that no image quality is lost in the process.
Why Resize Images For Web Use?
Images should also be uploaded to the correct size to fit the space where they will be appearing on the page. Failure to do this can result in several different outcomes;
- Images that don’t fit the space and therefore throw off an entire area.
- Large images as a result make your website load slowly and compromise the overall user experience.
- Small images that look fuzzy and distorted.
All of the above make your site look less professional and have a negative impact on user experience. How can I fix these issues we hear you cry?
There are a few options out there. Many of which involve resizing your images to the correct size for the area of your website where they’ll be showing. We’ll go through these shortly. However, lets start at the beginning and find out what size you need the image to be?
If you need to go back a step and locate images to use on your site then you can check out our recent post about How to Find Free Stock Images to help you with this process.
Finding My Image Size Using Google Chrome Developers Console
The easiest way to locate the required image size is using Google Chrome Developers Console. For this you’ll need to be using Google Chrome as your browser. If you’re simply replacing an existing image with a new image on WordPress you can easily find out your image by simply right click on the image that you want to find out the image size for. Then select the option on the drop down menu titled ‘inspect’ (it will be at the bottom.) A new tab will either open in a new browser, if using more than one scree. Or to the right of your screen if using a single monitor or laptop.
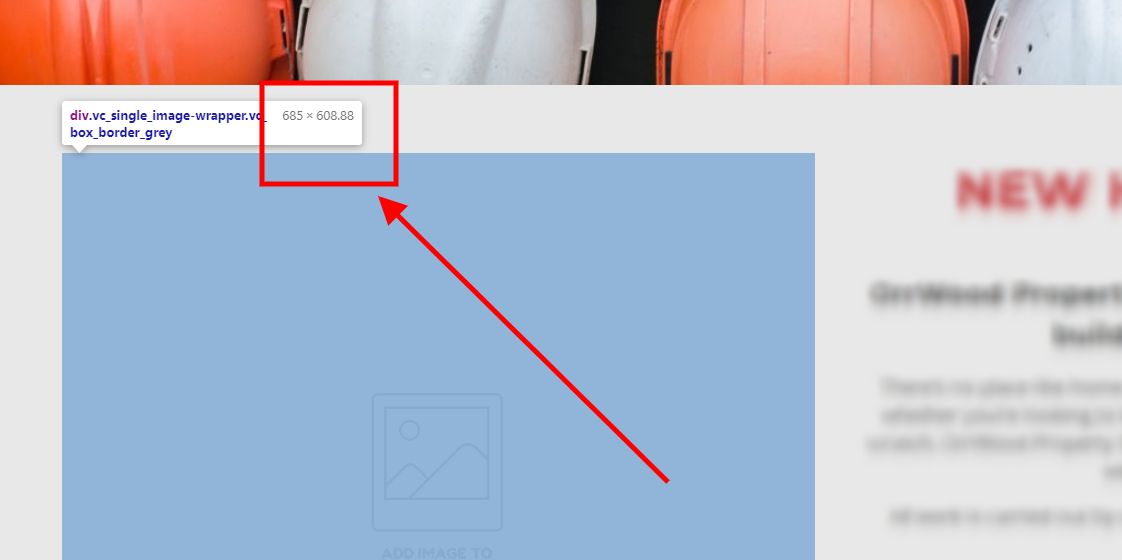
There will be lots of code visible here. Don’t be overwhelmed, a lot of this isn’t relevant to the task at hand, what we’re focusing on here is the image size. So click inspect again on the image you’re looking to replace and you’ll see the code specific to that image appear. Then hover over this code in developers console. It will turn blue. You’ll then see the image on the page you’re working on appear blue and an image size displayed to the left. You’ll then be able to use this size to edit your new image to fit the space.
Finding out the Image Size for a New Image Element
Alternatively, if a new image is being added to a completely new area within the website. Then the easiest way to check the required image size is to save a blank image element and click update. Next view the page in the front-end of the website. You can check the size of the box that the image will sit in by right clicking on the box and then clicking inspect element. If you hover over the box it will then show you the image size.
So for instance this image size will need to be uploaded as 685px width to fit the area.
How do I Resize An Image?
Adobe Photoshop
The easiest platform to resize an image is Adobe Photoshop and is what we generally recommend, because it’s fast and user friendly.
To resize an image in Adobe Photoshop start by dragging and dropping the image you’d like to be altered. Then select image from the header menu and image size from the drop down menu. You’ll then be able to enter the new image size that you’d like to update to. Ensure that the image size is in pixels. You’ll only need to enter the width and the height will then update automatically based on your image composition. Once this has been done save your work and your image is ready to upload.
There is a free online version of Adobe Photoshop, called Adobe Express Editor with minimal editing options which could be used if you didn’t want to pay for the full paid version. This will allow you to access the basic editing tools such as crop and resize which we’re referring to in this post. As well as a handful of other editing tools.
Other Platforms for Image Resizing
Irfanview
If you aren’t able to access Adobe Photoshop then an alternative platform to use is IrfanView which can easily be downloaded and set up. It’s slightly more complex to use for those who aren’t so IT proficient and is generally better for bulk re-sizing lots of images at the same time.
Online Tools
There are many image sizing tools online that can help you resize images. This blog post by Oberlo helps outline some of the best. With so many free photo editing tools online that combat a whole variety of editing options. Making it easier than ever to make your images look ultra professional and web site friendly. Without the need for expensive editing software.
Be Funky
An online editing software to have a play around with is Be Funky which provides a whole range of editing options for your photos. Along with the simple resizing tool. Allowing you to touch up images, add digital effects and incorporate text and other imagery. This editor has a free version and a paid version. You can use the simple editing and resizing features for free, or if you do wish to experiment with some of the more complex editing features then you can pay the monthly membership to access these.
Photo Resizer
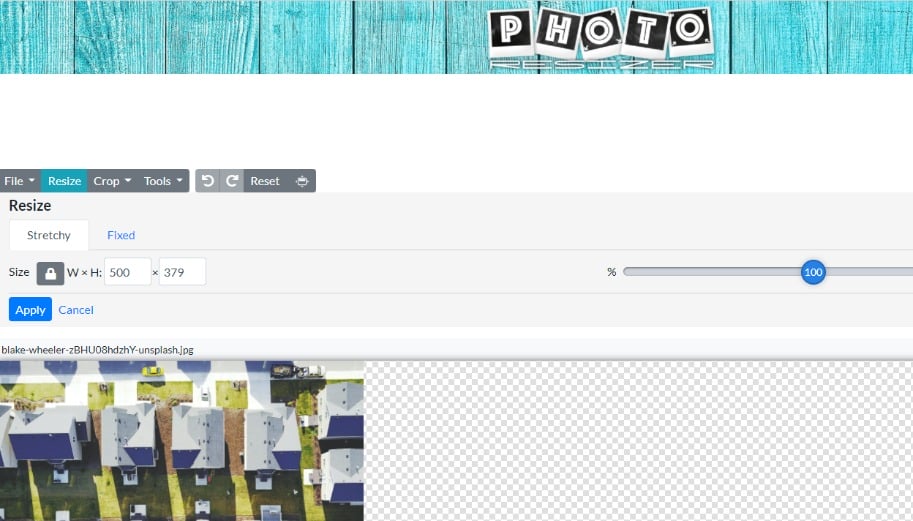
Another great online tool is Photo Resizer which allows you to upload images and resize in seconds. While allowing you to view the image online before downloading. This tool is particularly useful as it also allows you to compress the image to reduce the file size. As well as altering the format of the image file.
While the crop tool is really helpful to adjust orientation of images as desired. Unlike some of the other online editors where you’re restricted by the number of image edits each month, this tool has no such restrictions in place.
Offline Tools
Windows Photos
If you have Windows 10 installed on your machine you’ll be able to edit images from your folder in Photos by simply clicking on the image. The image will then open full screen in a new app with various tabs along the top of the page.
If you click on the edit/create tab, and then select edit from the drop down you’ll then be able to access the editing suite. To simply resize the image you can select from the drop down options on the right hand side of the page. Although you can’t select the size of the image in pixels, it does allow you to crop or edit the orientation of the image. Changing it to be square or widescreen etc.
If using this tool, you’d need to use it alongside one of the other online editing software options listed above to allow you to adjust the dimensions of the image.
GIMP
Finally there’s a free image editing software that’s similar to Photoshop called GIMP which can be downloaded to your computer to allow for offline image editing. There are a whole host of editing options including various resizing options. It’s a tool we’re quite new to however it’s fairly easy to use and offers an alternative free solution to allow you to edit or resize your images for your website without having to access online.
Resizing Stock Images
Alternatively if using new stock images, some sites have a facility to resize your image before download. These sites include Unsplash and Kaboompics. Whereby the appropriate image size can either be selected from the drop down menu when downloading. Or can be entered manually as shown in the below screenshot taken from Pexels website.
If you don’t currently have high quality images that you want to you use, then we’d recommend selecting a range of images from one of the above listed sites. These have free usage rights and can be used online free of charge. The fact that you can edit them to the size you require before download will save you a great deal of time if you aren’t confident editing the image size using alternative software.
Resizing Images For WordPress
You’ll now have a clear understanding that it’s exceptionally important to resize images to the correct size before uploading these to your website. With a size specific to the area where the image is being used. Not only resizing the image for appearance but also compressing to reduce the overall file size to keep your site loading fast and seamlessly. As well as keeping hosting costs to a minimum. While selecting high resolution images that appropriately reflect the brand image that you wish to represent.
We hope you find some of these tools useful when preparing content or updating your website. A small aside. This doesn’t really relate to image size. However, always ensure that your image is renamed to a name that is relevant to the SEO target for the page that you are uploading to. As search engines like image names to be consistent with the content that is on the page.
Taking the time to consider the space where images will be used. Then resizing them using the online and offline tools and techniques outlined in this blog post will not only result in a more professional looking website. But will also increase the load speed of the site as a whole. Improving user experience. As well as positively impacting SEO.
Our website speed optimisation service goes hand in hand with our CDN subscription for clients looking to improve their overall site performance. Leveraging resources such as Google PageSpeed and Core Web Vitals metrics provides us with actionable tasks to implement. Therefore creating tangible results to enhance your overall user experience.
Hopefully this guide has given you a clearer understanding of how to resize images for web use. If you’re still unsure or have a question on a specific area which relates to your own website then please do contact us and we’d be happy to advise you. You can read more helpful guides on the blog section of our website.


