WordPress Admin Area User Guide
*This post was updated in June 2020 to offer a more comprehensive guide to navigating your WordPress admin area.
This WordPress admin user guide has been written for the purpose of giving our clients a reference point and guidance. While navigating through their WordPress dashboard. Depending on your access levels for your admin area, you may see different menus in the left-hand navigation tab. We’ve broken this guide up into several short sections with sub sections to keep it as simple as possible. However you can navigate to related blog posts that go into much greater detail on each topic should you require further assistance.
Quick Links
As this is a lengthy post with lots of content, we’ve included a quick access menu below. This will allow you to navigate to the area within this guide that you require with ease. Just click each link to jump to the relevant section within the post.
Admin Dashboard
Editing Posts
Creating a New Post
Adding Images
Viewing Pages
Page Options
Editing Pages
Replacing Images on Pages
Editing Text Blocks
Adding Colour to Text on Pages
Duplicating A Row
Further Page Editing Tools
Updating a URL
Saving, Previewing and Publishing
Editing Menus
Adding New Users
Your WordPress Profile
If you are an administrator for your site, you will see more menus in your admin panel. But generally, if we have designed the website for you, you will be granted editorial access so you can update your text and images through the pages and posts sections.
We will look to continually add content and advice to this article on an ongoing basis. If there is a topic specifically that you feel we’ve missed and that would be helpful, then let us know and we can add this to the blog post. Likewise, please don’t hesitate to get in touch if you require any assistance with your website, and we’ll be more than happy to help.
WordPress Admin Area Guide
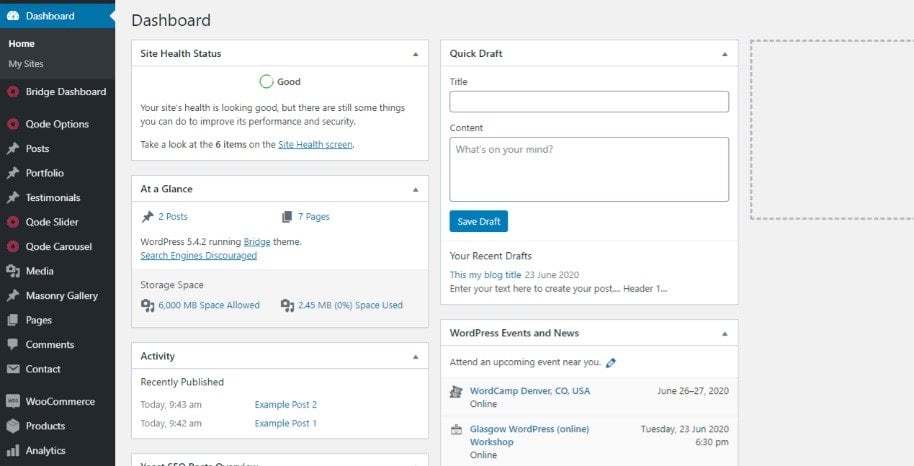
The admin area URL for your website will be unique and have been created by us specifically for your site. We don’t use the default WordPress admin URL for any of the websites we create for security purposes. If you don’t know what your admin area URL is, then please don’t hesitate to contact us, and we’ll re-issue it to you. Once you’ve logged into the admin area you’ll arrive on dashboard.
Admin Dashboard
The dashboard area exists primarily to give a summary of your site and your activities. It shows the latest updates to your website and recently published articles (posts). As well as giving the ability to write a quick draft post. You’ll also be notified of WordPress related events here. You can hide areas of the dashboard you don’t want to display and customise it slightly. Although this is an area of your site that you’ll rarely use, you’ll be more drawn to the specific locations within the dashboard, which we’ll now look at in more detail.
Editing Posts
The posts you will create are generally used for blogging purposes. As WordPress themselves details, “posts are what make your blog a blog”. Posts are generally articles or news items that you will write and create. Posts will be displayed in your blog area generally, on the page specified in your admin settings. Important here to understand that your “posts” have to appear on a “page” created, and not the other way around. To try to give an example, this article you are reading just now is created as a post, which sits in our blog area, which was created as a page. The posts you create are displayed by default in chronological order, so the newest posts will display at the top of your blog page.
In your admin area, on the left-hand side navigation menu. If you hover over “Posts” you’ll see 4 options by default. These are “All Posts”, “Add New”, “Categories” and “Tags”. Clicking on the 1st option all posts will show you all of the posts that have previously been created. This area will show all of the posts that have either been published live on your website or left as drafts to come back and finish later.
Creating a New Post
It’s easy to create a new post by selecting the ‘Add New’ option in the posts dashboard. This will open a fresh new posts page, allowing you to add your own content. Start by adding a title for your blog post and saving this using the ‘Save Draft’ button. You’ll then be able to use the WordPress Classic text editor to form your post within the admin area. The text editor works in a similar manner to Microsoft Word whereby you can input text and then edit that text using various options. Such as making the text bold, adding hyperlinks, quotes, bullet points and headers. As well as images and other media. To find out more about how to navigate these options then take a look at our blog post on Creating and Editing Posts in WordPress. Here we’ve provided much more detail on these various functions.
You’ll then be able to preview your post in the front end of the website before publishing live. We recommend saving drafts of your post regularly to avoid losing any of your work.
Adding Media Including Images to WordPress
The media area is where you upload images, videos, PDFs etc, for the pages and posts on your website. Hovering over the Media section in your left menu shows 2 options. These being “Library” and “Add New”. The library section shows all of the images that are already in your media area that have previously been uploaded. To put more images or other content into your library, simply click on the ‘Add New’ button. Here you can either drag and drop files from your desktop, or select files from a specific folder on your computer.
Please note that it’s important to ensure that images are resized to the correct dimensions to fit the space where the image will be used on the website. Uploading unnecessarily large files will lead to your website running slowly and lengthy load times for the content within your sites pages. Resulting in a negative overall user experience. Read our guide on resizing images for web use if you’re unsure on how to complete this task.
It’s also extremely important that you use high resolution images for your website that give a professional feel. If you don’t have professional images of your own then you can find free stock photos online that can be used.
Viewing Pages
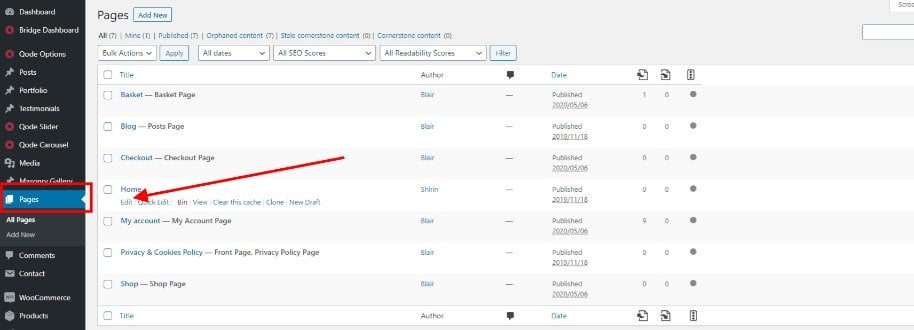
Another important aspect of the admin area which you’ll likely use often is the pages dashboard. Pages you create are used within the menu of your website and are not to be confused with posts, which are different. So, for example, common examples of pages you might create would be your “About Us” or “Contact Us” page. These can be found by selecting ‘Pages’ from the left navigation menu in the admin area. This will open a list of all the pages on your website. Allowing you to edit these by hovering over the page you’d like to make changes to and selecting ‘Edit.’
To view, all of the pages already made for your website, hover over the pages menu in the left navigation bar. Then click on “All Pages”. You’ll now see a screen that displays up to 20 pages that have been created on this 1st screen. By default, it will display all of the pages, including any that might be drafts. You can filter to show just published pages, or show just the drafts.
Page Options
Scrolling down now to any one of your pages. If you hover over any of these, you’ll see more options appear. These options are “Edit”, “Quick Edit”, “Bin” and”View”. If you have certain plugins installed in your admin configuration, you may see more options here at the end. For example, a common one we create is the ability to “Clone” or create a “New Draft” of a page. The purpose is that if you want to have 2 pages that are going to be very similar in layout or design, you don’t want to create them both from scratch! Simply clone one after you have created it, thus creating another draft of this first page created. Which you can then use as a template and edit the content within to make a new page.
So 2 of these 4 standard options you’ll see when hovering over a page in your all pages layout are obvious to what they will do. Clicking on “Bin” will delete the page, moving it to your bin area which contains all your deleted posts (if any). Clicking on “View” will take you to the front-end of your page that’s been created, and let you see what the live version looks like. If the page is set to a draft, then the “View” option is referred to as “Preview”. The preview link will let you see what the draft looks like currently before you publish it for the world to see.
Editing A Page
Let’s now click on the “Edit” button of any page from your list, to see how you can make some changes to a page. Hypothetically, for the purpose of this section of the guide, we’ll say you’ve clicked on and want to edit your “About Us” page. So now you’ll see lot’s of boxes and areas on this next screen which might look a little daunting and confusing at first. But don’t fear! We’ll break it down and keep things simple. So the first box the title of the page. This by default will be used to form the URL (slug) of your web page. So ours here for our “About Us” page will be /about-us for the website URL slug. You can, of course, have a different URL structure if you want.
Replacing Images on Pages
Underneath the permalink URL slug area, you’ll see a button that says “Add Media”. Clicking on it will allow you to upload images and the like to your media gallery. Which can then be immediately selected and inserted into an area of your page that you are working on. You’ll be able to see where there are images within the page as they’re marked as image elements. You have the ability to upload new media or choose from the existing list of media items that you have previously uploaded. When you click on this a new pop up will appear with image options.
You’ll be able to click on the existing image to replace it with a new image from the media library. You can edit the name of the image, detail a caption for it and write an image description here, among other options. For more information on adding and editing images you can read our image editing post.
Editing Text Blocks
One of the most commonly used elements, and something you’re likely to update often, is the text blocks that form your websites pages. To edit a text block you simply click on the text and it will then open up the text editor. The format of this is similar to the text editor we looked at for writing posts earlier in this guide. With a white box that contains your text copy and the editing options above.
Editing Bullet Pointed Lists
Some text blocks have bullet points contained within them. To distinguish these from other text blocks you should compare the content in the back and front end. You’ll be able to tell from the content’s layout on the page. If you aren’t sure, just click on the text block and you’ll see the bullet list appear. Bullet list content can be added or edited by using the bullet point button in the text block editor settings as demonstrated in the guide below.
Adding Colour to Text on Pages
You may wish to change the colour of certain areas of text within your websites pages to make them stand out. Or break up large passages of text to be more aesthetically pleasing. It’s easy to add colour. Firstly it’s important that you select from the colours that are already part of your theme. These can be found by selecting Qode > General from the left menu in your dashboard. You’ll see a list of coloured boxes showing the colours used throughout your website. Select the colour that you wish to use and click on the drop down, you can then copy the colour code (which begins with a #) to use on another area of your site.
Once you have copied your colour you’ll need to navigate to the area of text that you wish to change on your page. Open the text editor for the chosen block and highlight the area of text as desired. Once you’d done this you’ll need to click on the colour editor. This is shown as an underlined ‘A’ as demonstrated on the below guide.
Below the coloured boxed you’ll then be able to add a custom colour. When you click on this a pop up will appear, you’ll then copy and paste your colour with the hashtag. That you’ve copied from Qode > General options in here. Saving your changes you’ll be taken back t the text editor where you’ll visibly be able to see the change to your text. You’ll then need to click save on the text editor.
Finally click preview to view your changes in the front of your website before updating the changes live on your site. You can always revert back to the original by following the above process.
Duplicating a Row
If you’re new to navigating the WordPress Admin area and aren’t confident using some of the features. We highly recommend using the duplicate a row tool to play around and experiment. Without having the worry that you’re going to lose work that a developer has spent time creating when building your website. This duplicate a row feature of WordPress means that you can simply create a copy of the row you wish to work on. Which will appear immediately below the existing row on the page. Giving you peace of mind to make any amendments, knowing that all is not lost if you make a mistake.
To duplicate a row just click on the clone button. You can then check you’re happy with the changes you’ve made with your new row in the front end by clicking preview. Once you’re happy you’ll be able to delete the old row (below) your shiny new row that you’ve edited.
Further Page Editing Tools
You can learn more about further page editing tools for WordPress in our WPBakery Page Builder user guide featured in our blog area. This goes into much greater depth on the common features of editing pages including updating spacer gaps, adding Google Maps integration, embedding video content and much more.
Updating a URL
To change the URL slug, just click on the edit button to the right of it, and manually type the URL you want to have for this page. For example, you might want it just to show as /about or whatever you want. To save these changes you want to make, simply click on the “Update” button at the far right-hand side of this page. If you are working on editing a draft, this button will show as the word “Publish”. If you want to keep the page as a draft and not put it live, don’t push the publish button yet. Simply click on the “Save Draft” button which you’ll see further up the page just about the “Publish” button.
Saving, Previewing or Publishing Changes to Posts or Pages
You’ll always have the ability to preview changes to a page before putting them live, by clicking on the “Preview Changes” button. Located in the top right-hand side of the page you are editing/creating. In this area we also have the ability to change a page from being a draft format to being published.
In the “Status” line just click on Edit, and a drop-down menu will appear giving you the option to change the status of your page. Under Status is the “visibility” drop-down menu. Which gives you 3 options for your page. You can set it to be public, which is the default option, and what you will generally want to do for most pages. As well as this, you have the ability to set the page to be password protected here,setting a chosen password for your page. Alternatively you can define the page visibility to be private. Setting the page to be completely private, will only make it visible to editors and administrators of your WordPress admin area.
If the page is currently set to be a draft then the blue button will read “Publish” clicking on this will post the changes live on the website. Meanwhile if your page is already published live and you’ve simply made some amendments then the button will read ” Update.” Likewise, by clicking this, it will override the live version of the page with the new updates you have created while editing the page.
Editing Menus
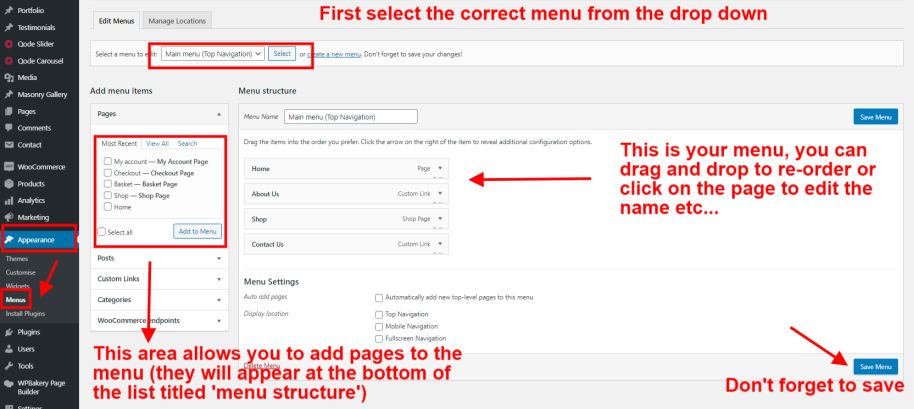
You have the ability to edit menu structures within your WordPress admin area by selecting Appearance > Menus from your WordPress dashboard. This will then open the menu editing area. Firstly you’ll want to select the menu you wish to edit from the drop down as highlighted in the guide below.
You can add new pages that are outlined to the left of the menu area, they will appear below the existing pages on the menu. Then drag and drop these to into position to change the order they appear on the menu. Meanwhile, you have the ability to edit menu items by clicking on them. This will enable you to change the name, and make other changes.
If you have a large number of pages in your main menu for example, you may wish to create varied menu structures with sub menus / sub pages. This can be achieved by adding the top level menu to the left, then creating an indent for the sub pages under that menu item. These sub pages will show upon hover on the menu bar. So for instance the pages ‘Womens Fashion’ and ‘Mens Fashion’ as demonstrated below will only appear when you hover over shop on the menu. Likewise ‘Accessories’ will only appear when you hover over ‘Women’s Fashion.’
When you’ve finished making any changes to menus, don’t forget to click on the save menu button to the right of the page.
Adding New Users on WordPress
The users’ tab will really only give you access to your own profile for editing purposes. So for example, if you wanted to change your admin password, it will be done here. You can also update your email and add other information to your profile. Where access levels allow for your admin area, you may also be able to add other users and edit their profiles for them.
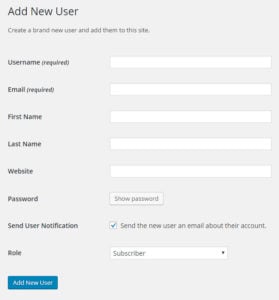
Hovering over the “Users” tab in your left menu shows 3 options. These being “All Users”, “Add New” and “Your Profile”. The 1st option labelled All Users, shows a list of all of the users that have been created for your admin area. It details their access level. I.e. whether they are an administrator or editor of your WordPress admin panel area. Clicking on the Add New option as you may have already guessed, gives you the option to add a new user for your admin area. You will need to fill in some mandatory information for each new user.
So for example, the username, email address and password for your user are mandatory. Therefore we advise that you set the password for your user and send them a notification email telling them you have created a profile for them. This is the most secure option and means they can then reset their password from there after logging in. Your also able to set the access level for your new user. So if you want them to be able to create new pages and posts for your website, or edit existing ones. You need to create them to be an administrator or editor. What you see here, will depend on your own user’s access levels to your admin area.
Your WordPress Profile
Finally, the “Your Profile” option lets you edit the settings of your own profile. So, for example, you can reset your password here. Or change your email address for your profile. The username cannot be edited for a profile. If you want to have a different username, you need to create a new profile, unfortunately.
Admin Area User Guide For WordPress
We hope you’ve found this WordPress admin area user guide helpful. Allowing you to navigate the most commonly used functions of WordPress. While updating your website with ease. We understand that it can be daunting learning something new. So one of the reasons we opt for WordPress to build our clients websites is that it provides a user friendly interface. Easy to navigate, regardless of your knowledge or skill level. You’ll notice that once you’re equipped with the basic functions you’ll find it easy to perform many of the daily actions you’ll require to update your site with ease. Many of the processes are just repeated, regardless of weather you’re creating a page or a post.
We’ve also created more specific user guides for WP Bakery Page Builder which you may find helpful. As well as a WooCommerce User Guide for those who have e-commerce functionality within their WordPress website. Meanwhile our blog area is also filled with useful resources and guides on a whole variety of topics. So do check there, should you wish to expand your skill set.
Still not found what you’re looking for? Let us know and we can help by answering your questions, or updating this guide with the tools you need. You can also find a huge amount of WordPress related help and support on the WordPress website.
At Primal Space, we have been offering WordPress website development services for years now. Contact us for any website services at all related to WordPress and we will be able to assist you.


