Configuring Primal Space Hosted Email Address
*This post was updated in June 2020. With technology dramatically changing over the past 4 years, we no longer recommend the use of POP/IMAP and understand that better solutions include G Suite and Office 365. You can read a more detailed post that we’ve recently published exploring in more depth the benefits of Office 365 and G Suite. We are no longer able to help or support our clients with POP setup. Learn more about what services we do offer as part of our Email and IT support and the services that we’re currently unable to provide to our clients.
Configuration Guide
For the purpose of this instructional guide, we’re using Microsoft Outlook to configure and setup a POP3 email account. This guide has been written with the purpose of aiding our clients that have email and website hosting with us, and with the setup of their email accounts, we host for them.
So in Microsoft Outlook, hover over the tools menu at the top of the page. then click on account settings option. A box will then appear showing any existing email accounts you may have set up. Click on the link that says “New…” to start creating your new mailbox.
You’ll be asked if you want to set up a “Microsoft Exchange, POP3, IMAP or HTTP” account, or “Other”. By default, the first option is selected, which is what you want to select too. So just click on Next, to go through to the next screen.
The latest versions of Microsoft Outlook have the ability for “Auto Account Setup” here within this section, but we’re going to bypass this and enter all of our settings manually. So please select the check-box next to “Manually configure server settings or additional server types”, and then click the Next button.
The next screen lets you choose your e-mail service. The 3 options given will be “Internet E-mail”, “Microsoft Exchange” or “Other”. The default option again is what we want here, so leave “Internet E-mail” selected, and click on the Next button.
We’ll now enter our email settings here. So in the user information area, you’ll add the name you want to appear when somebody received your email. So generally you’ll just want this to be your full name in here. And then add your email address in the next box obviously.
In server information, you want to leave POP3 selected. The incoming mail server will be mail. and then the domain of your email address. So for example for our email [email protected] we will be entering mail.primalspace.co.uk as the incoming mail server. The outgoing mail server will be the same too. So just replicate the same answer for this.
Log-on information will have been issued to you by us for your email address. The username is simply your full email address. And the password entered here should be the one given to you by us.
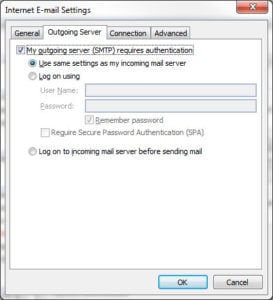
Almost there, please now click on “More Settings”. Then click on the Outgoing Server tab. You’ll see the options in the image below. So we’re going to replicate the settings you see in this image. So click on the check-box next to “My outgoing server (SMTP) requires authentication”. And we’re going to use the same settings as my incoming mail server.
Then before we click on the OK button, please go to the Advanced tab. The incoming server (POP3) should be set to 110. And the outgoing server (SMTP) should be set to 25. These are the default server port numbers settings and should remain in place. In the Delivery section, we want to ensure that “Leave a copy of messages on the server” is checked. As well as the checkbox below which defines how long you want your message to be stored on our server for.
Choose the number of days you would like it to remain there. 14 is the default and this is fine to remain there. If you go on holiday for 2-3 weeks, for example, you may want to increase this value to accommodate any gap in you being able to download your emails. Please also select the third checkbox which will remove emails from the server when deleted from the “Deleted Items” folder in your email client. After all of this is complete, please now click on the OK button to complete this section.
At this point, you can then click on “Test Account Settings” to check that everything works. If it does, you’ll receive a test email through to the new inbox you’ve just created. If all is well, then simply click on Next one last time, and then Finish. That’s it, your email address has been created in your mail client, and you are now ready to send and receive emails on your new mailbox.
The procedure for setting up your email account in other email clients and other devices such as a Mac or iPhone require slightly different settings. We will create a how-to guide for multiple devices at a later date. If the above settings don’t work for you, and you have email hosting with us here at Primal Space. Then please don’t hesitate to get in touch with us. We’ll help you through the process of setting up and configuring your email address.
Exploring Other Email Providers
We do recommend that clients who are heavily reliant on the performance and resilience of their email setup, to look to Google Apps or Microsoft Office 365. Both of these services offer a range of more advanced features for a low monthly cost and can be set up on your domain. So you still get to keep your email that contains your company domain within it. A great article comparing the two products and the differences between Google Apps and Office 365 can be found here.


